Did you know...When dragging an image...From version 9.8.0
When dragging an image across your screen, B-values and point numbers can now be suppressed to lessen flickering problems. This option can be
turned on/off from the Settings menu, see "Settings/Show B- and PointNumbers when dragging with your mouse"
|
|
|
There is now a mechanism to Export parts of each ring to a new image file.
This gives you a way to collect image data with CooRecorder for later feeding it into your own software algorithms
for development of blue intensity calculations.
To facilitate your programming effort the ring images have been rotated so that all rings lay in a common direction.
A separate file contains pixel addresses for each ring frame. To see what I mean: Scroll down to the very end of this section to see an example!
|
|
On how to make careful blue intensity measurements
and on how to export your ring images to your own software.
|
 Diagram 5
|
Note: If you click on a point on the curves (e.g. at 2002) a circle will light up around the corresponding point. It goes away
as soon as you release the mouse button.
|
|
|
If you are going to measure blue values, you have good reasons to try set your points carefully so that the "blue channel mining areas"
(the area of the ring where blue channel data is collected) are properly layed out as shown in the diagram above. I.e.
each ring image collection area/"the data mining area" should overlap only one and the same ring of the tree.
If you set the help line perpendicular to your ring borders and see that new points are all placed along the line, you are
usually on the way of getting good measurements. For this you might best use the AutoPlace command when working with pine.
|
|

Diagram 7
After you click OK, the resulting screen might look as in diagram 5. Please notice the "Use fat lines for rectangles" checkbox in diagram 7.
By making these rectangles more clear (thick white borders) we enable quick identification of "points in error" (=they will become heavily slanted).
See also Getting the blues from NAM01 - an example
|
|
|
The Calculate Color Intensity (CI) command at the blue lb icon  gives you tools both for calculating blue values and for checking
where data is collected. (Provided you have checked "Show where data is picked...") This is all illustrated in diagram 5 above with
those white rectangles showing where data will be collected.
For that we are using a CI Collector which is set up for export of (almost) full ring images. gives you tools both for calculating blue values and for checking
where data is collected. (Provided you have checked "Show where data is picked...") This is all illustrated in diagram 5 above with
those white rectangles showing where data will be collected.
For that we are using a CI Collector which is set up for export of (almost) full ring images.
Data is selected as "Mean of slices" as that method does not overwrite the image itself but gives you all these clear white-framed rectangles.
For later really calculating blue data, you might prefer the "Mean of sorted pixels" method, but for showing where the data frames
will be placed the "Mean of slices" method gives the best illustration.
|
|
Exporting your ring images for separate processing
|
 |
 These are the exported ring images.
|
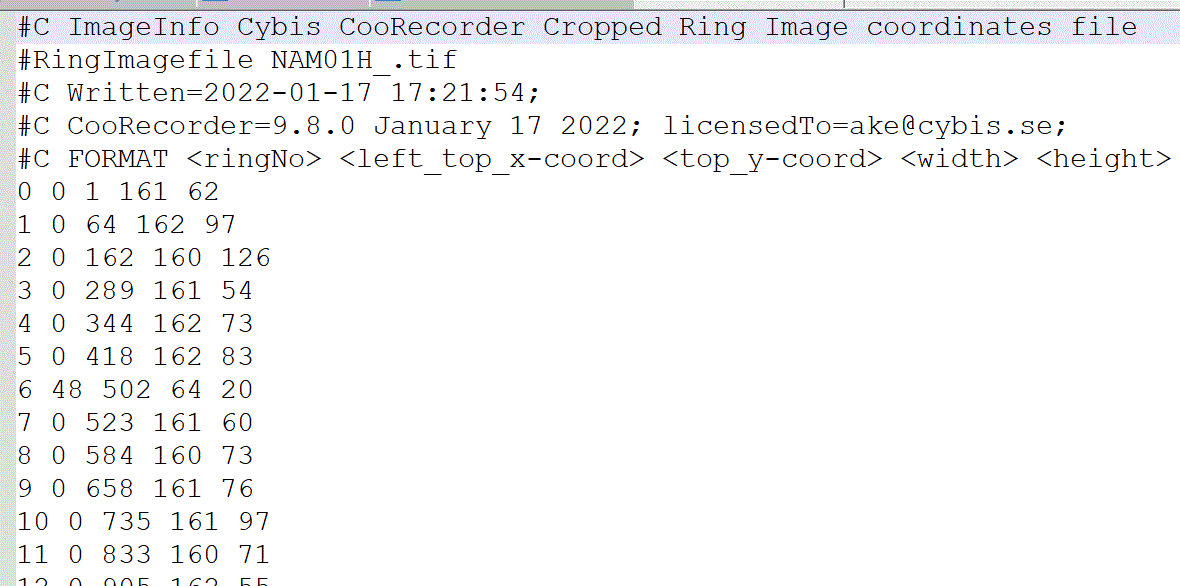 This table shows the size of each ring image and where you will find it.
|
|
A message box will now pop up telling that the export data has been directed to a .tif file and a .txt file.
The .txt file gives you entry points into the .tif file, i.e. where a ring image is stored (x,y) and how
big that ring image is (width, height). E.g. ring number 1 has its top left corner at x=0, y=64 and it
consists of 162 columns and 97 rows. You might access its topleft blue pixel value by a call to GetPixel(0, 64).B
when using Visual Basic. In the example program (available on request) there is a mechanism to load all the blue values
into a matrix from where you can easily retrieve them from your own program.
|
|