
|
Let us start with the motor chain saw. Best samples are large samples taken as a plate
across the log. Of course you cannot do this with your favorite house or an old historical house which
should be preserved. But it is quite common that houses are rebuilt in one way or another.
Either there is decayed wood in a wall which has to be revived or there is an opening
made for a new door. That's your chance to get several samples from the house!
If you have samples made with a chain saw, then you do need a grinding machine, an "abrasive belt grinder". If you are working with samples of oakwood, bear in mind that grinding dust from any hardwood may be carcinogenic. Also, dust from any mildewy sample may be very unhealthy. |
|
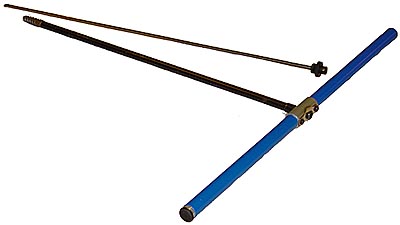
People working professionally with dendro dating use core borers. That is a type of borer which is hollow and used to cut out a bore core accross the log. The core taken out has dimensions lika a pencil. That shown on the picture above has a diameter of 7 mm. |

Sample taken from the old school house at Nämdö 1995 by Lars Löfstrand.
|
With the core borer you can take samples from dry wood without using a chain saw. Though, when the wood is heavily infected by woodworms the samples fall to pieces and you get wood-flour instead of treerings. This type of borer also have an outer diameter higher than 10 mm which demands not only a strong drilling machine but also a boring chuck which is wide enough. With these borers, oil is sometimes used as a lubricant. Though the oil tend to smear with the drill cuttings and prevent it from getting out around the borer. When you take out the borer, the core is often left in the middle of the hole in the log. You need something to cut it at the bottom so you can take it out. I use a metal strip which is bent at the end to work as a knife. It is also somewhat bent across the length section to make it stiff. It is made of those metallic strips used to keep big packages together e.g. when delivering building materials. - A slim U-formed aluminium profile may also do. When you have taken out the core, there is a big hole left in the house. Think about putting something into it, for example a cork. So have it with you. |
|
Increment borers are used by forestry people to analyze the trees' rate of growth. This is an essential instrument if you want to get some samples from old living trees. This type of borer is said not to be very well suited for dry wood. Neither very hard wood is appropriate. (Though read the article about boring in dry wood at the end of this section!) An increment borer can also be used in old wet wood like a water-soaked log. The increment borer is used with a long metallic strip, an extractor. (In Sweden sometimes named a spoon.) It is inserted into the borer along the core when the borer is in its innermost position. Press in the extractor to its innermost position inside the borer hole. At the bottom end of the core the extractor tip will now press the core towards the inner walls of the borer and lock it in that position. When turning the borer half a turn backwards the core is then ripped off from the bottom of the hole. If you now turn the borer a full turn forwards the core will be pushed back towards you and you can easily draw it out with the extractor. |
|
When planning to collect cores, also plan for taking care of them.
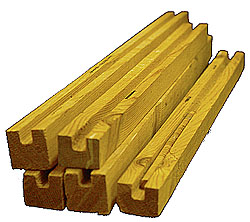
When building or repairing houses, grooved parts of a board are now and then cut away.
(From tongue and groove boards.)
I cut them into 30-40 cm long pieces and save them for storing cores in the groove.
A long bit of masking tape over the groove keeps the core in place. Some dendrochronologists taking care
of many cores during a days work often use "straws" often bunched together with some tape.
Drying. After collecting cores you have to let them dry (if they are not already dry, as when taken from a house). Usually I prefer to let the cores dry in their "holders" described above, but I carefully remove the tape over the groove with a sharp thin knife. If you leave your cores laying free, there is a considerable risk that they will get crooked which makes mounting very difficult. |

|
After you have collected some cores you have to mount them on some sort of wood strip. I prefer something with a cross section like 8 * 20 mm. When the core has dried it is time to glue it towards the strip with wood cement. Use small clamps to keep the core in place. |
|
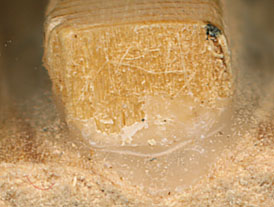
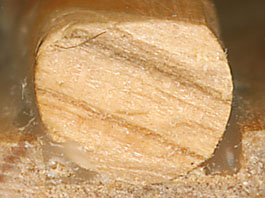
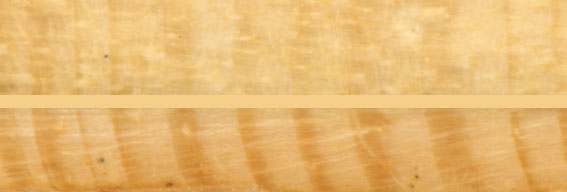
With the fibres laying you get a diffuse picture when you scan the tree ring pattern with your scanner.
The upper part of the picture above shows a core which has been incorrectly mounted with fibres laying. The lower part of the picture shows the same part of that core but viewed sideways (where it was first grinded a second time). Try to avoid mounting the core twisted! With a twisted core, some part of it will have its fibres laying after gluing and consequently you will get a low contrast picture of that section of your core and difficulties to later measure it! I usually write several marks along the core on that side which should be mounted upwards. This makes it easier to position the core when gluing and clamping it in place even when it is partly twisted. Note: Twisting of cores usually occurs because your increment borer is not properly cleaned inside or you are not using a suitable lubrication (e.g. 5-56) in the borer. When the inside surface of the borer is not clean enough or is not lubricated, that will prevent the core from rotating freely inside the borer. This tends to twist the core! So keep the inside of your increment borer very cleaned from resin and dirt and use lubrication to prevent corrosion! When taking samples, also use lubrication (spray) to let the core rotate freely inside your borer. When the glue has dried its time for a careful grinding. Use abrasive paper of various grades. The finish should be very high. At last I sometimes use some sort of furniture cream (polish) to make thin rings easier to see i.e. to make a higher contrast between earlywood and latewood. Consider liquid paraffine for this, as bought from a pharmacy or drugstore (medically used as a laxative). Such paraffine is free from additives and will not get coloured itself. Avoid linseed oil which will harden and build up surface which may make your tree rings more difficult to see after a couple of years. Note: Using a polish may be a hinder to marking (see below) as the surface gets oily. |

| Now it is time to inspect the rings visually. A microscope like that shown on the picture makes the job easier. (This instrument is also very usable for inspecting other things.) |

|
If you consider buying a scanner, try to get a sample scan from it and see what you get. Also consider how fast the scanner is doing the scan.
If you need to scan lenghtwise the scanner surface it might take a considerable time for a single sample. Another point to look at is whether there
is an upwards protruding frame around the scanner glas. This will prevent a long sample to get in contact with the glass thus making bad focus.
On the internet you can find more software, an overview is found at Henri D. Grissino-Mayer's Ultimate Tree Ring Web Pages, see the section "Other sites"!
Today CDendro has provisions for showing both reference and sample curves together on your computer screen. You can even see both the normalized and ring width curves above each other. And you can easily scroll the curves in relation to each other. So there is not much reason any longer to have a light table for curve comparisons. |
About boring in dry wood with an increment borer
by my friend Torbjörn Axelson in Björbo in Dalarna(though rendered quite freely into English by me)
|
I had been told too that using an increment borer did not work with dry wood. Then I talked with a fellow in the village who is running a business of inspecting electricity lines. He told me that all day long he and his assistants are boring with increment borers in poles to find any poles which are rotten inside. So I borrowed a borer from a forest warden and tried boring in some old barns and also up at our loft. It worked very well. Then I bought my own borer (from Mora, 25 cm, Teflon covered). That one I borrowed was older and without Teflon, but it worked as good as the new one - perhaps it was a little bit stiffer to bore with. I do not know if it depends on the type of borer - which product - but it seldom happens to me that the core gets stuck inside the pipe. Though when it happens I use a stick to press the plug backwards out of the pipe after I have taken the borer out of the block. Usually the core comes off easily when I use the extractor. But after boring in fresh living pines the pipe sometimes gets very sticky inside. Then a dry core may get stuck inside the pipe. If required I use some CRC 5-56 Lubricant spray (penetrating and anti-corrosion oil) inside the pipe and wipe it clean with a bit of a rag. But doing this is a rare occurence. The greatest problem is that the core usually falls to pieces. So I have to be careful and see that all pieces are collected in their right order. And also be prepared to discard some unsuccessful borings - already at the boring location - nearly one third of the borings are unsuccessful! Cores taken from very dry wood (from attics in dwelling-houses) or from blocks which are becoming rotten, seem to fall in pieces more often than others. When boring in hewed blocks or block walls which are a bit mouldered
you have to bore at an angle from below to get the wane from the block
or to get as much sapwood as possible. Then there are two problems:
Note: My experience of boring in dry wood comes exclusively from boring in spruce and Scotch pine trees which both have quite soft wood compared to e.g. dried oakwood! |
|
Boring in dry oak wood is actually very uncomplicated. Usually you get solid cores though of course there may be some cracks. The area around the hole will be less splintered than when boring in Scots Pine or Norway spruce. So you do need something to put into the hole afterwards to make it less conspicuous. Boring in living oaks is much more difficult. The borer jams and you get black wet sticky sap inside your borer. The greatest problem with oak samples is probably to identify the border between sapwood and heartwood. It is often a good idea to mark that border before you mount your sample. (The pores in sapwood are open so you can look through them if you hold your sample turned the right way in front of a lamp.) When you have some practice you will see the difference between sapwood and heartwood also when the samples are already mounted. Why is it important to find the border between heartwood and sapwood?
Colouring oak wood:
|